Teach Me Suspension (Part 6): Compression and Rebound Damping
In the last part we began the conversation on damping and what job it plays within the suspension.
As a quick recap, damping is what changes (and tames) the manner in which the spring compresses and extends.
In this part we are going to continue on the damping theme, but we’re going to expand a bit more and cover the two different types of damping – compression and rebound – and the part they play.
The Two Main Damping Types
As we learned in the last part, the damping arrangement is what limits how quickly or slowly the suspension can compress and extend.
Both the compression and extension damping are handled by two separate circuits within the suspension, and they are adjusted separately too.
Unsurprisingly, the damping arrangement that handles the manner in which the suspension compresses is known as Compression Damping.
Compression damping limits how quickly the suspension is able to compress when riding over bumps, or when the rider gets hard on the brakes for instance.
When it gets to the point where the suspension needs to extend again, you also want this action to be controlled.
How quickly the suspension is able to extend is handled by Rebound Damping.
As I said, both rebound and compression damping are handled by separate circuits within the suspension and can be adjusted separately too.
The reason why they are separated into two different circuits is because they require two differing levels of damping.
When you ride over a bump and the suspension compresses, your compression damping has an easier time because it only has to contend with the unsprung weight of the wheels, discs, calipers etc.
Rebound damping has a harder job because not only does it have to tame the forces of the spring extending, but it also has to manage the sprung weight at the same time.
Settings for Each
So we know the job of each part of the damping system, but what difference do the changes make?
When we refer to too much damping, it means that the damping is restricting the movement of the suspension too much. This can also be referred to as being too slow, because it is slowing down the compression and extension of the suspension.
Too little damping and the suspension is allowed too much movement. This can also be referred to as being too fast.
From a compression point of view, too much damping would over-restrict the suspension’s ability to compress. This means that it wouldn’t be able to compress quickly enough to soak up a bump, and the forces would therefore be transmitted into the chassis and in to you.
Too little compression damping and the suspension could potentially bottom out and bounce right off the track.
Once you’re on the other side of the bump and the wheel wants to extend again, rebound damping comes into play.
Too much rebound damping will mean the suspension can’t extend quick enough to keep the wheel in contact with the track, so it leaves the ground and flies off the top of the bump.
Too little rebound and the wheel is forced back down too harshly, which could potentially top out the suspension.
Maybe at this point you’re thinking that a lot of the negative effects detailed above are quite similar to having incorrect spring rate or preload settings.
By having too much or too little damping, you bring about similar effects as having too hard or soft a spring, so the after effects are quite similar.
However, by having the correct spring rate for your weight, and the correct amount of preload adjustment as per your sag figures, its then down to the dampers to make the suspension even more efficient, and the ride even more comfortable.
It gives you that extra layer of versatility to find one collection of settings that works throughout the vast array of situations that your bike and suspension has to go through over a given lap or session.
The optimum damping settings would allow the wheel to track beautifully over bumps, staying in full, good contact with the track over both the up and down-slope of a bump.
On the up-slope, your compression settings should be light enough so that the spring is allowed to soak up the bump, but not so light that the suspension bottoms out and bounces right off the track at the top of it.
On the down-slope, you want your rebound settings to be light enough so that the wheel can continue to nicely track the down-slope, while not so light that it pushes back up on the chassis.
As we discovered in the last part it is the shims inside the cartridge that create a valve for the oil to pass through, which gives us the linear relationship between damping and oil velocity that we want in order to better find the setting we need.
Often riders will change these shims out for ones of a different size, or they can also change the number of shims used.
This allows the rider to very finely tune the damping for what they need. This practice is referred to as revalving, and it is something that is often done by racers looking for the perfect settings.
We will talk about revalving in a future part, but for now we are going to be keeping the conversation on external damping changes i.e. using the compression and rebound adjusters.
Most modern sports bikes now come with adjusters on both the forks and shock for setting rebound and compression damping.
While the majority of the suspension’s damping is handled by the main valve and shims (blue), there is a separate circuit that also handles some of the damping.
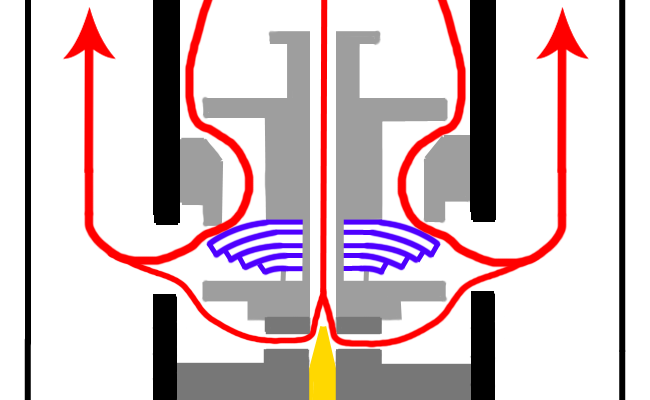
When you turn the damping adjuster on most bikes, it is the yellow needle shown in the above diagram that changes position. This separate channel carries some of the oil flow, and to alter how the oil flows through that channel a needle is put in place to restrict flow.
When the adjuster is turned clockwise, the needle moves deeper into the hole, making the opening smaller. This restricts the oil flow and adds more damping.
Both the rebound and compression cartridges in the suspension will have this ‘needle and seat’ arrangement.
Further to this basic damping adjustment, more and more bikes are now coming with high-speed damping adjusters.
Though, typically, the high-speed adjusters are only found on the compression side on stock suspension systems.
High-speed damping works in a similar way to the valve shims, offering up a variable opening depending on the velocity of the oil trying to pass through it.
However, the arrangement is a little different with a single shim used to cover a large hole, with a spring holding it in place.
At low velocities the shim remains closed and the oil flows through a bypass.
At higher velocities, enough pressure begins to build up as the oil is compressed and it forces the shim open to allow more oil through.
In order to change the setting, the adjuster alters the amount of preload on the small spring holding the shim closed. More preload on the spring means that more force needs to be generated by the compressed oil in order to get the shim to open.
In this typical stock arrangement, all this really does is alter the point in the oil velocity scale at which the shim opens, in turn changing the point at which the high-speed circuit is engaged.
In aftermarket suspension you often have the ability to change the actual amount of high-speed compression damping that’s used.
Ok, this part may well have had you feeling a bit cross eyed at times. As the systems get more and more intricate it can be a little more difficult to understand. I hope you’re sticking in there nonetheless.
In the next part we are going to be talking about how to make physical changes to the damping settings and what that is likely to do for you from a riding perspective.
This is when you actually begin to start testing damping changes…….and when the fun begins.
Related Posts
How to Get the Most from Your Track Time: Pre-Ride Prep & How to Approach Your Day
How to Deal With the Panic When Someone Takes Your Line
Learning to Trust Your Tyres Through Technique & Experience
Using Other Riders to Gauge Your Speed and Uncover Weaknesses