Learning a New Track: How to Prepare for a New Track Experience
If we’re looking to get the best out of our first day at a new track and decrease the time it takes us to get up to speed, then taking a little time before our day to prepare for what lies ahead is the perfect way to do just that.
By taking a few steps to get our heads around a track we are visiting for the first time, it will not only calm the nerves and the fear of the unknown, but it will put us in a very good position to get up to speed quickly and have a safe and enjoyable day.
There will be an initial time outlay, but that outlay beforehand will be saved when you get out on track and already know what’s coming and what to expect, ultimately meaning more smiles per miles for the time you’ve paid for.
Here’s a look at how we can prepare for a new track experience.
Get a Track Map
The first thing you’ll want to do is get your hands on a track map for your notes. If you’re going to a track that does track days, it’s highly likely you’ll be able to find a map using Google Image search.
Simply head there and type in the name of the track you’re visiting and take your pick.
You’ll want to print a few copies out for your notes as well as one or two to take on the day so you can change the notes if needs be.
Finding On Board Footage
To give you an idea of where the track goes as well as how you should navigate it, the best option for determining these things is through on board video, as that’s the closest you’re going to get to actually being there riding.
Thankfully in recent years large numbers of riders actually video record themselves out on track, and while I’m sure they did it just to show their mates, we can actually use this footage to help us find the information we need. Head over to YouTube and look for some track day footage for that track.
Now obviously I don’t expect you to find the ‘perfect’ riding footage for a particular circuit, because aside high level racers I doubt there’s any track day rider that can max out the potential of any given circuit.
However, I wouldn’t want you to initially look for footage from top level racers either because the difference in pace and the way they handle the bike will make it difficult to really gauge what you can be expected to do when you get to the track.
What I think is better is to look for footage of a competent fast group rider (maybe even a low level club racer), because they’ll often show a fairly decent level of track craft (mainly the lines they take) but they won’t be too fast to the point where we can’t relate to what they’re doing relative to us.
Finding Reference Markers
The first thing you want to do with the video is use it to find your reference markers. This will be your braking, turn, apex and exit markers. Once you’ve found them it will give you a complete dot to dot path to follow around the track (having your visuals in check will help with following the dots).
Where does the rider in the video brake? Where do they turn? Where do they apex? Where are they consistently hitting on the exit? These are the questions I would be asking myself as I follow them round each corner.
The types of markers you’re looking for should be easily noticeable, not the type that you have to hunt for until your right on top of them. If you can, find markers on, next to, or over the track such as tyre marks, kerbs, yard markers or gantries, something that is as much in line of sight as possible.
If you can’t find one like that, you can use markers away from the track like buildings, fences, posts and trees; the closer to the track the better.
Note down each marker on your track map for each corner as you find them. Some featureless corners won’t have obvious markers at the point you want, but can you find one a little before or after that same point that you can use? Or is there an overall picture you can see in front of you or something that comes into view at that particular point that could be used? Try and get creative if you can’t see an obvious marker.

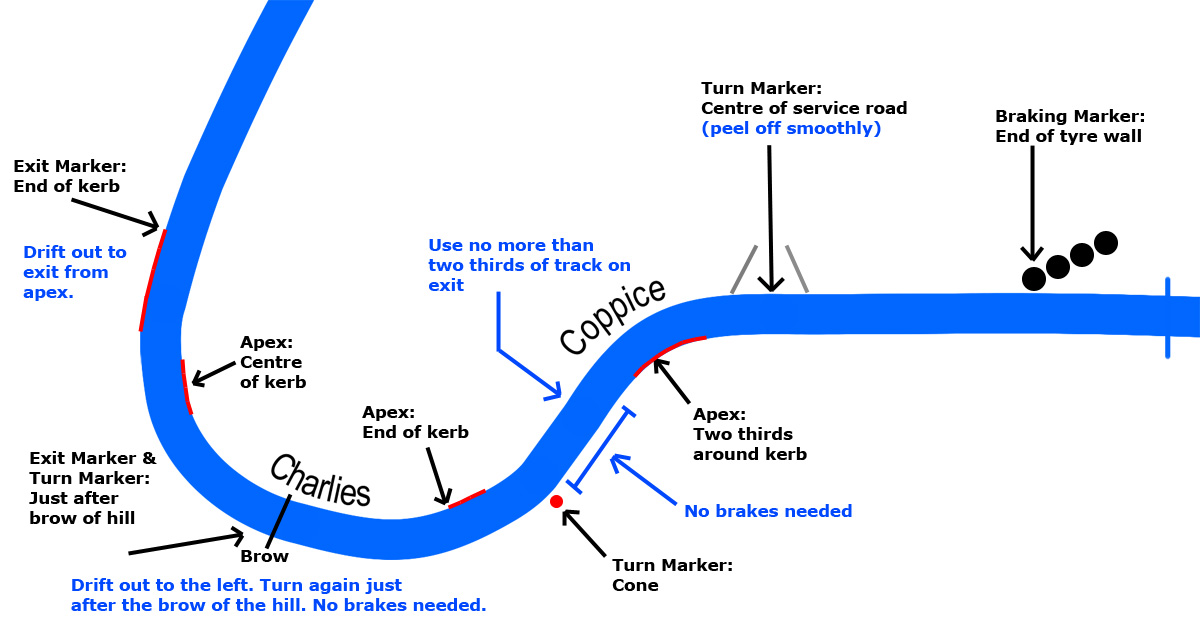
Also be weary that with some of the more twisty circuits in the UK (think Cadwell and Oulton Park) some of the corners flow onto the next and markers will overlap, something you can see in the picture to the right. The picture shows what your track map could look like after you have added your reference markers.
How to Join the Dots
Now you’ve found your markers it’s time to turn your attention to how the rider in the video is actually navigating the track, most notably the lines they are taking.
For the most part this shouldn’t be too difficult as with many corners the rider will brake at a certain point, turn in at a certain point, move to the inside to meet their apex, and drift out to meet their exit, all in the traditional way you would expect.
However in some instances the rider might take a less than conventional line, such as apexing very late (farther around the corner) or not using the entire track on the entrance or exit, and you need to try and figure out why.
It could be that it’s not necessary to use the entire track, or that a late apex squaring off line means they can get on the power earlier. Another reason could just be an incorrect line choice, but this is something you need to determine, which leads nicely onto the next point.
The picture above shows how your track map could look after you have studied the lines and added the notes.
Using Racer’s Footage
We are lucky here in the UK because many of the popular tracks are ridden by riders of an extremely high level in the British Superbike Championship, which is all televised. This means that we can watch some uber fast racers riding around many of the circuits available for us to ride on track days.
If you’re lucky you can even find on board footage of various BSB riders at some tracks that we can use to learn something from.
Like I said earlier, it would be tough to try and emulate what they’re doing in the racing or onboard footage, but what we can use it for is to determine whether or not the rider in the previous footage we were watching has a good grasp of the sort of lines and track craft they should be using for a given track.
If they’re taking an extremely different line to the top level racers, this is more than likely down to a bad choice of line.
Take a bit of time to study some high end racing footage if you can and hopefully this will complete the picture that you started to create in the previous two steps.
Visualising a Lap
Something I like to do once I have all of my marker and line notes in place is to study them until I can put the notes down and actually visualise and talk myself around a full lap. As a simple example of one corner, I might say:
“Brake at the start finish line, approach corner over the mound just left of pit exit line, turn at the middle of the service road on the left, apex in the middle of the kerb, let the bike drift wide to meet the end of the exit kerb.”
Doing this until you don’t need your notes will help you no end when you get out on track as it will mean you near enough know exactly where you want to be and where you’re going before you’ve even laid rubber down on the track.
On the day
In an ideal world the marker and other notes we have made would be perfectly placed so we can go out and get straight on it, but in reality with the differences that will inevitably come with how one bike and rider combination gets around the track compared to another, we can’t expect what we have noted down to be perfect.
Take it slow at first and see how the markers fit you for size. Does one feel out of place for your speed and style or have you found a better marker for the same spot? Don’t be afraid to change it and note it down on a fresh track map. Build on this fresh track map throughout the day, noting which markers feel right and which ones you want to change.
Hopefully by the end of the day you will have a completed track map with notes that you can use for any future days at that track.
As I said up top, this approach to a new track experience does take time beforehand, but you will ultimately get that time back on the day as you won’t spend the first half of it just figuring out when the track turns left and when it turns right (ok, you can be forgiven for this at Silverstone!).
Many riders are just happy to turn up and ride their bikes around the circuit any which way they can (and this is absolutely fine) but if you’re looking to get the most out of you and your track time, by outlaying some research time before hand you are best setting yourself up to do just that, while making your day somewhat safer by reducing the chances of getting things wrong.
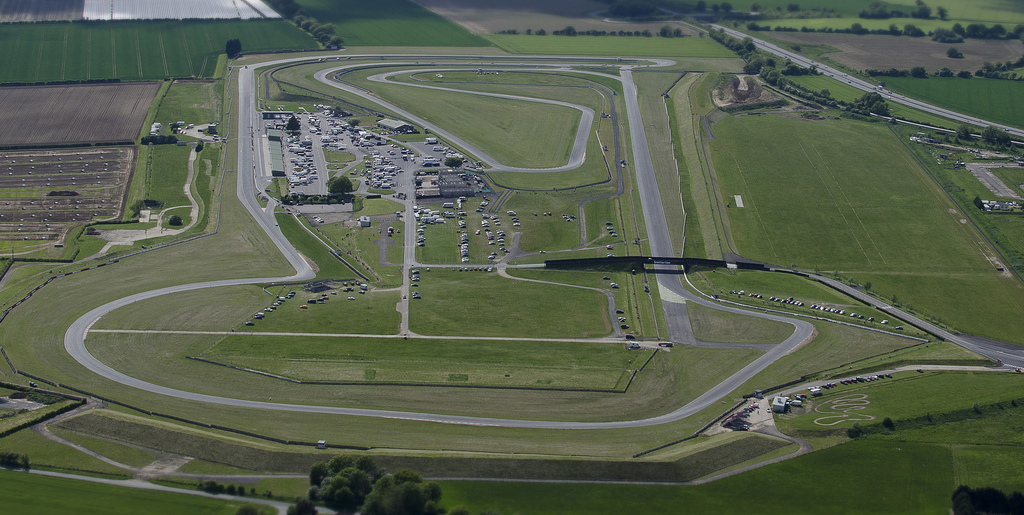
Photo by John Fielding
Related Posts
How to Tackle Hairpin Corners on the Track
How to Get the Most from Your Track Time: Pre-Ride Prep & How to Approach Your Day
Learning to Trust Your Tyres Through Technique & Experience
How to Deal With the Panic When Someone Takes Your Line