6 Steps to Your First Knee Down & Generally Improve Body Position
Out of all the riding tips available here, it’s this knee down guide that attracts the most attention.
It’s no surprise to me, because I know all too well how powerful the lure of getting your knee down for the first time can be, even if it isn’t something that will really benefit you a huge amount.
There are confidence benefits to be had from knowing how far we’re leaning, but really we all want to do it for the first time for the grin, self-satisfaction and boasting factors.
This guide is going to provide you with 6 solid knee down tips you can take on your quest to get your knee down, tips that if you implement correctly will mean that the sound of plastic scratching road isn’t too far away.
Let’s jump right in then, shall we?
Proper Knee Down Technique: It’s About Body Position & Speed
You’ll be surprised to know that in most cases you’re probably not that far off from the lean angles needed to get your knee down, but because your body position is way off it looks like you’re miles away.
Here are some points to help you get in the right position, we’ll start from the bottom:
Step 1: Feet stable on the pegs
There are different ways to set up the feet, but as long as they provide you with a stable base for the rest of your body you’re on the right lines. Personally I find it best to have both pegs just in front of the balls of your feet, and you’re almost trying to wrap your toes around the pegs.
This allows me to slightly raise my calf on the outside leg (the leg you’re not trying to get your knee down with) and lock my knee and upper leg into the tank.
The inside foot sees the peg in the same position, but with a very slight turning of the heel inward towards the bike. If you’ve got a heel plate you can turn it in and rest it on that as a reference.
You will see other riders and even professional racers with their feet in different positions. One of the favourites is to have the peg in the middle of the outside foot with the toes pointing outward.
Again it’s all about personal preference, but the most important thing the feet can do as said above is set up a stable base for the rest or your body (for moving around on the bike, weight transference etc), which leads me nicely onto the next point.
Step 2: Your legs hold you on the bike, not your hands
With your feet positioned as described above, you should then have your outside leg up against the tank and locked in, this and the outside peg will be your main anchor points as described below in the ‘try it yourself’ section.
Stick your knee out as far as you can without straining. This is where pointing your heel (on the inside leg) inwards towards the bike helps as it gives you a little more turn at the hip to stick your knee out.
Step 3: How much cheek off seat?
It’s as simple as, as much as you wish while still being stable and anchored on the bike without the need to hang on with your arms. A good starting point is to hang one cheek off, although some people slide all of their bum off, others only half a cheek.
It’s something you’ll find in time, but the end result should always have you stable on the bike and not hanging on the bars.
Step 4: Not too close to the tank
If you sit with your nut sack (or lady garden) being pulverised by the tank, when you come to slide off to one side you will have a tendency to rotate around the tank, pushing your inside knee to the front of the bike, rather than outward towards the road/track.
Sit a few inches back so you can easily slide sideways on your seat. Your inner thigh will then be where your crotch once was.
Some riders feel that sitting right up to the tank aids you in the braking zone and also helps you get more weight forward to help stop wheelies on corner exits, but personally I prefer to sit off the tank a little because it more easily allows me to get in to the position I want to be in.
Step 5: Don’t forget your head
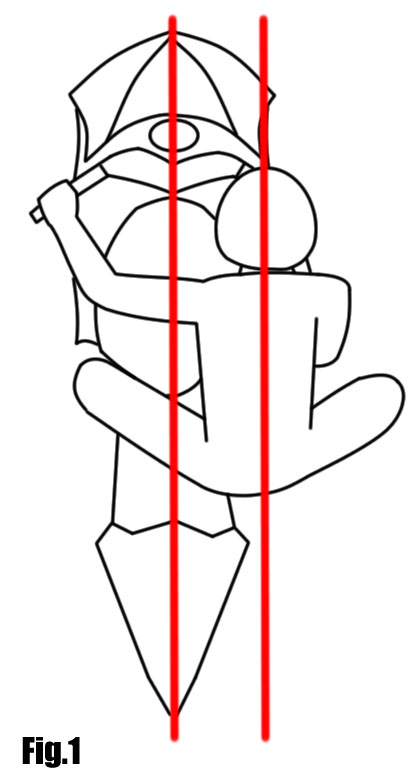
Again different people have different styles (think Toni Elias vs Michael Rutter), but a nice neutral position will see your head sitting roughly where the inside mirror would be on any modern sports bike. Imagine trying to look at yourself in the mirror and you won’t be far off a nice head position.
To give you an idea of how it should look, imagine looking at yourself from a bird’s eye view and drawing a line from your head down your spine to your tail bone.
Now when hanging off, that line should be parallel with the line of your bike running right down the middle from front to back.
What you don’t really want is your lower body hanging off with your head still central on the bike. This will have you all crossed up on the bike and will actually make it harder to stick your knee out correctly.
Step 6: Build your speed slowly
I’m sure you don’t need me to tell you, but you can have the greatest body position setup in the world, but if you’re travelling at 5mph you’re not going to be getting your knee down anytime soon.
However, you don’t need to be going 100mph either, especially if it’s a tighter radius corner.
If you don’t get your knee down after applying the above, let your speed naturally increase (and with it your confidence) and the necessary lean angles will come in time. Don’t rush trying to carry too much lean if it is going to place you well outside your comfort zone.
Try it at home!
If you have one, put your bike on its side stand and have a sit on your bike and practice getting into the position detailed in steps 1 to 5.
Note where you can feel yourself hanging on. If you can feel a strain in your arms, concentrate on tightening your leg muscles to clamp yourself on the bike.
The end result should see you being able to remove your hands from the bars completely, meaning that when riding you’ll have a nice relaxed grip on the bars to leave the front end to do its job of stabilising the bike.
Don’t worry if you can’t let go for too long, it’s harder to do when the bike is standing still, however you shouldn’t be falling off the bike as soon as you let go, but should feel fairly comfortable taking your hands off.
Extra Tip 1: Hanging off makes you lean the bike less
If you are correctly getting your body off and down to the inside of the bike you moving the combined centre of gravity of you and the bike inside of the centre-line of the bike, meaning it doesn’t need to be leaned as far as it would if you were going around the same corner at the same speed but sitting bolt upright.
Extra Tip 2: Get into position early
Get into position before you arrive at your turning point. Trying to move around on the bike while trying to turn will only add instability to the bike through unnecessary input, created from you moving your weight around and pulling on the bars to get into position.
I won’t go into further detail as it’s a little out of scope of this guide, but just remember, get into position early.
Summary
You will see plenty or track day riders and professional racers alike that do things differently, but the steps outlined above should give you a very good base to start from.
Something I’ve learnt in my time doing track days is that too much emphasis is put on body position when riders are looking at areas to improve when in fact there are more rewarding areas to concentrate on to improve your riding, such as your vision or exit power.
However, I know what it’s like to chase your first knee down and to get that feeling of euphoria after it comes, and because of this I completely understand why riders want to try and achieve it.
So take the body position tips above and apply them to your riding, it should set you well on your way to tidying up a sloppy riding position and/or getting your knee down for the first time.
If it doesn’t happen straight away give it time, as your speed naturally increases it will most certainly happen if you have a sound body position setup.
Related Posts
Body Position: What the Bike Wants From You As a Rider
How to Get the Most from Your Track Time: Pre-Ride Prep & How to Approach Your Day
Learning to Trust Your Tyres Through Technique & Experience
How to Tackle Hairpin Corners on the Track