Teach Me Suspension (Part 7): How to Make Rebound Damping Adjustments
The last couple of parts should have given you a good understanding of what the dampers do in your motorcycle’s suspension.
Keeping the conversation on damping, now we are going to move onto how we make the correct changes for ourselves.
In this part we’re just going to tackle changes to rebound damping.
Rebound changes are slightly easier to make because it isn’t always necessary for you to jump on the bike and start riding around.
To test differences in rebound you can simply press down on the bars or seat to see what happens, making it that little bit easier.
Also, it’s important to have your rebound working for you first before changing compression, because it’s rebound that’s going to have the biggest effect on your bike’s characteristics.
Compression damping on the other hand is in some ways regarded as a fine tuning tool, and if your rebound isn’t correctly set first, it can make those changes almost irrelevant.
Ok, so we know the job of the rebound dampers; to control the dissipation of energy stored in the spring.
Let’s get started on making some changes.
Locating Rebound Adjusters
While there may be a few different variations as to where you would find rebound adjusters on the forks and shock, typically they are in the same place across many different bikes.
Forks
On the forks, you’d be hard pressed to find rebound adjusters that are in a different place to the norm.
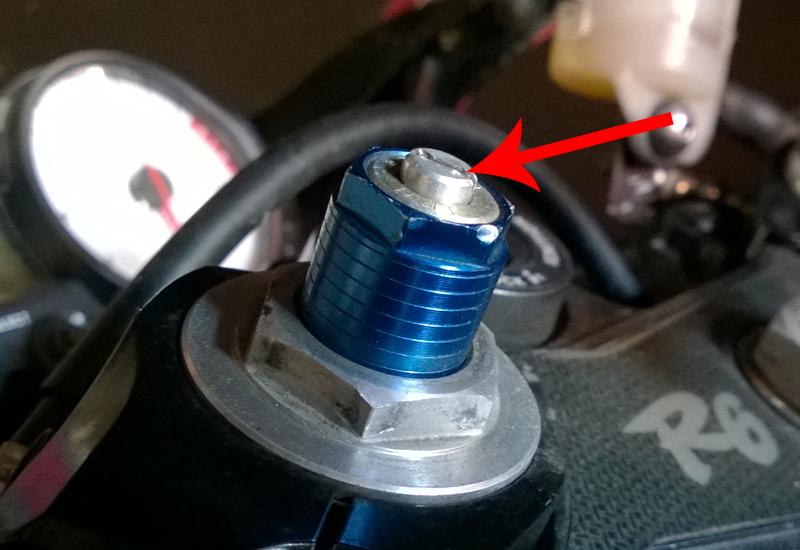
On most sportbikes you’ll find them at the top of the fork leg, often on top of the preload adjuster.
However, it isn’t unheard of to have slightly different arrangements.
Some bikes now feature single adjusters for both rebound and compression that handle the changes on both fork legs. If this is the case, you’ll normally have the rebound adjuster on one fork and the compression adjuster on the other.
When it comes to adjuster labelling, rebound adjusters will either be labelled as Rebound, or, like in many instances, Tension (usually just ‘TEN’).
But whatever word is used, they both do the same thing.
If your bike doesn’t feature the more typical adjusters, be sure to consult your owner’s/suspension manual for where they’re located and how to make changes.
Shock
As for the shock, the rebound adjusters are typically arranged in one of two fashions.
The first is a flat head screw mounted into the bottom of the shock.

The second common arrangement is a twisting collar fitted in line with the shock’s shaft, which is turned clockwise or anticlockwise to add or remove rebound damping.

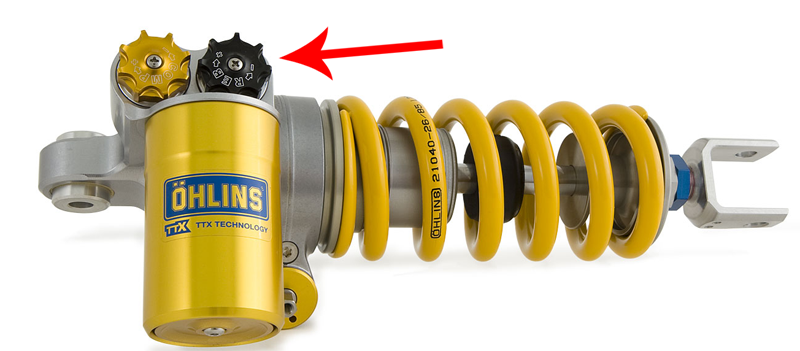
One last arrangement worth mentioning, being that they are more and more present in track day paddocks, is how sometimes both the compression and rebound dampers can be found together at the top of the shock. As this Ohlins TTX shock shows.
All of the above adjusters are for normal low speed rebound adjustment.
In some cases you may also find that your rebound dampers have both high and low speed adjustment.
However, high speed adjusters for rebound are very very rare. So much so that almost all stock and aftermarket suspension only feature low speed adjusters for rebound.
I wouldn’t worry if you don’t have this level of adjustment. It’s something that will only really be of a decent advantage for experienced racers. Otherwise, you’ll do just fine with low speed alone.
Making and Tracking Rebound Changes
Many adjusters will feature little detents inside the mechanism which create both an audible sound and a tactile feel when you make a turn. Feeling for and counting these ‘clicks’ is what allows you to easily track and find where you are in the range.
When people refer to something like “taking a couple of clicks off”, this is what they’re referring to.
If your adjusters don’t feature this, however, don’t worry. You can simply count the number of turns or half turns instead. It’s just as effective.
Ok, so first you’re going to want to see where you are in the range.
Forks
Starting with the forks, turn the rebound adjuster clockwise all the way to the stiffest (aka slowest) position, being careful not to over-tighten the adjuster.
The adjuster should only sit lightly in the seat when fully stiff, so turn it slowly, stopping as soon as you reach the end of adjustment.
Count the number of click or turns from your current position to fully stiff. Write this down as your current setting.
Do the same on the other side if you have separate rebound adjusters. It should require the exact same amount of turns.
As a side note, adjustments should always be identical on both forks.
So now with the rebound adjusted to fully stiff and with the bike off its stands, grab hold of the bars and apply a bit of front brake.
Firmly push down on top of the bars to compress the front end and then release immediately (keeping hold of the bars and brake). Just keep in mind how quickly the forks returned to their original position.
Being fully stiff, they should have taken a little while to return back to normal.
Now turn the rebound adjusters anticlockwise, all the way to their softest (aka fastest) setting, being sure to count the number of clicks/turns you made to get there.
This number is your full range, and the first number you noted down (current setting) is where you sit in that range.
If your bike hasn’t had any adjustments from new, your current setting should be near enough exactly where the manual says it is by default. There can be slight differences due to the manufacturing process, but it should be very close. At most one turn away.
With all the rebound off, have another go at firmly pressing down on the bars with the brakes applied.
You should notice a big difference from the push you made when the rebound was fully-stiff. The forks should spring back almost immediately and may even shoot past the original position before settling back down.
When making rebound changes, it’s important to note whether the changes have a noticeable effect on compression damping too (how hard it is to compress).
There are some bikes that have an adjustment relationship between rebound and compression. Changes to one can sometimes make the other feel different.
If you do notice a difference in one after a big change to the other, keep this in mind as you move forward.
Shock
For the shock you simply have to repeat all of the above steps.
Take your current settings by counting the turns to fully-stiff. Test what fully-stiff feels like. Then wind off all the rebound damping (counting the turns as you go) and test how that feels.
In order to test how the shock rebounds, have a friend hold the bike up at the front while you press down on and release the back of the seat. If you’re able, pressing down on the passenger seat will give you more leverage and a greater feel for the changes.
You should once again notice a big difference between the two opposite ends of the rebound scale.
Good Rebound Baseline
As a baseline for rebound it is often advised that it should take either the forks or shock about one second to extend back out to their original position.
To find that base setting, the easiest way is to adopt the ‘half way’ approach.
Start with the adjustment right in the middle of the full range. Test the rebound time using the above methods.
If it takes much longer than one second (too stiff i.e. too much rebound damping) then go half way between your current setting and fully-soft (three quarters out from fully-stiff).
If it’s much shorter than one second, go half way between the current setting and fully-stiff (one quarter out from fully-stiff).
This method may take the longest, but it means you aren’t guessing and can feel the rebound coming into the right setting as you go.
It’s worth noting that the changes to rebound damping are not necessarily linear, due to the needle and seat design we looked at in the last part.
This means that a one click change away from fully-stiff may not have as big an effect as a one click change away from fully-soft.
For this reason it isn’t uncommon to have a lot of rebound damping applied (only a few clicks away from fully-stiff) because that’s all that’s required to alleviate enough of the damping to get a good setting.
Once you’ve found a setting that creates this one second rebound, write it down as your base settings.
Go through the process again for the other end of the bike and right down the base setting once again.
If you’ve never made adjustments before, compare your setting to what was applied before you made the change. If there is a sizeable difference in setting, you will notice a sizeable difference on the bike.
Now it’s time to go ride
If you can, test the rebound changes at the same location as you used for preload. A track is always going to be better because how you ride will be fairly repetitive.
If you notice any changes in handling, note down what those changes were. Good or bad.
Don’t worry if the bike feels worse. You can always go back to the setting you had applied before. That’s why we note everything down, you see!
Rebound Responsibility
For the front, rebound changes are most noticeably felt over a series of bumps, or in the braking zone.
When rebound is too stiff (slow) the forks cannot extend back out quick enough before hitting the next bump in the series.
This means that over each subsequent bump the suspension compresses more and more and becomes more and more stiff.
If it’s too soft (fast) it has the opposite effect and the suspension extends more and more over each bump as the suspension rebounds too much after each bump.
In the braking zone, rebound most comes into play when you release the brakes before tipping into a corner.
If it’s too soft and the forks rebound back too quickly, it can give you a pretty horrible sensation that you’ve lost traction at the front end just as you’re beginning to lean the bike over.
Ideally you want your rebound set so that the ride height remains the same as you load the front end when entering a turn.
For the shock, rebound plays the biggest part in the braking zone.
When getting hard on the brakes the vast majority of the bike’s weight is on the front, but you don’t really want the rear to leave the track surface.
With very stiff rebound settings on the back and a harsh application of the brakes, the weight will quickly travel to the front but the shock won’t extend quickly enough to keep the rear wheel in good contact with the ground.
As a result it can momentarily skip along the surface, or leave the track altogether.
Keeping the above in mind you can now go out and see how each change affects the bike and what you feel.
If something isn’t quite right, go in a different direction by a sizeable amount (around 30%) to see if that solves the issue. You can then make smaller changes (like you did with the half-way method) to get closer to what you want.
Even if you feel you have a perfect settings, if you’ve never changed rebound settings before or experienced what they do, it’s always worth making changes anyway just to expand your knowledge on how to make changes and the direct result they have.
It’ll only strengthen your knowledge base for the future.
Related Posts
How to Get the Most from Your Track Time: Pre-Ride Prep & How to Approach Your Day
How to Deal With the Panic When Someone Takes Your Line
Learning to Trust Your Tyres Through Technique & Experience
Using Other Riders to Gauge Your Speed and Uncover Weaknesses